Auto Attendant Step by step: (Teams)

 Auto Attendant Step by step:

In Microsoft Teams, an auto attendant is a virtual receptionist that automatically answers and directs incoming calls. It provides callers with menu options, allowing them to navigate to specific departments or individuals within the organization without the need for human intervention. Auto attendants enhance communication efficiency and provide a professional call-handling experience within the Teams app..


  1. Firstly, Go https://admin.microsoft.com (login first)>

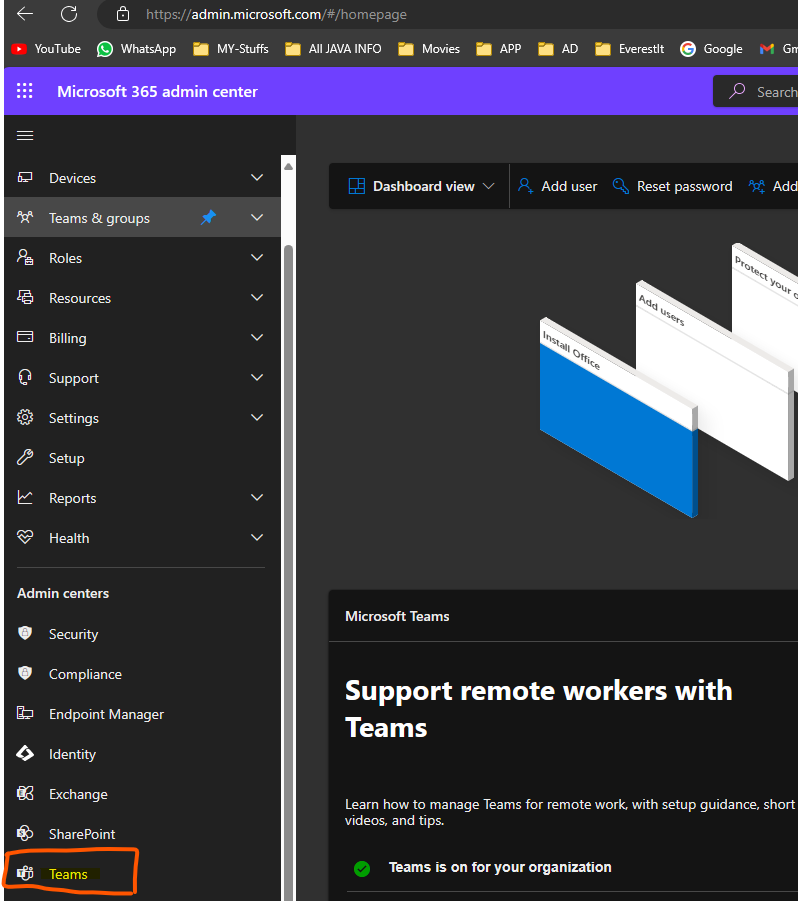
    • Click on Teams  (from Admin centers)

    • Click on Voice > Resource account and create a resource account >


Fill up the “Add resource account form”  and
click on save button.

You will see the resource account details. 

  • Since we don’t have a phone number and License yet.

So we have to get both now.


2. For license; go to https://admin.microsoft.com 

  • Click on billing > Purchase services 

  • Search for the license: Microsoft Teams phone Resource Account (Month to month) ( it is a free license so you can purchase it without paying anything.)


You can see your license


3. Now go to https://portal.azure.com 

  • Search users and click on your user (in my case: ChamenaGharHelpdesk)

  • Click on “Edit properties” > Setting> Choose location “United State” > and  Save.


Now assign the license to the (ChamenaGharHelpdesk) user

  • Click on Licenses (from left pane)

  • Click on + Assignments option


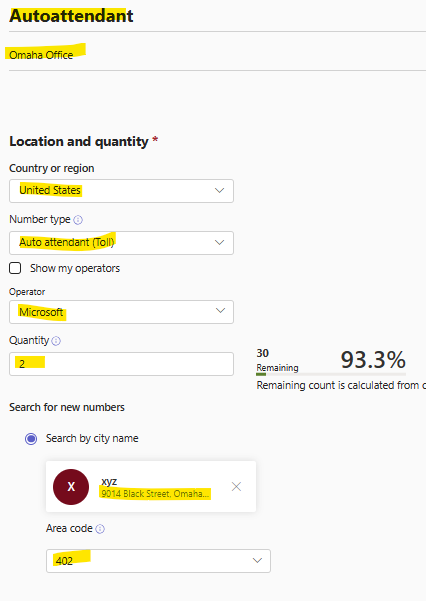
4. Now go to https://admin.teams.microsoft.com (for Auto Attendant)

  • Click on Voice > Auto Attendant 

  • Click on +Add option

  • Name: ChamenagharHelpdesk

  • Operator (optional): No operator

  • Time zone: give your time zone

  • Language: English(United States)

  • Click on Next


Call Flow:

  • Greeting options

  • Choose add a greeting message and type your greeting messages.

Call Routing Options:

  • Choose Play menu options

    • You can upload audio file  OR 

  • Choose “Add a greeting message

    • Type your greetings

  • And  set menu options using “+Assign a dial key

You can see the result below.


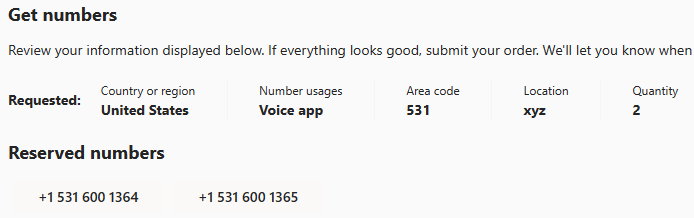
Now time to create Phone number for “chamenaGharHelpdesk user”


  • In Teams admin center, click on Voice > Phone numbers > + Add

    • Fill the form like right screenshot image:

    • Name: autoattendant

    • Which office: Omaha office

    • Location and quantity

      • Country: United States

      • Number type: Auto attendant (Toll)

      • Operator: Microsoft

      • Quantity: 2

      • Search by city name: address

    • Then click the Next button. 

  • You got these numbers.


  • Click on Place order button


Now time to assign these numbers to users:ChamenaGharHelpdesk

Click on Resource Account:

  • Select the user account from the list.

  • Click on Assign/unassign option

  • Phone number type: Calling Plan

  • Assigned phone number: choose one

  • Click on the save button.


Again Select the ChamenaGharHelpdesk

  • Click on “assign/unassign” option

  • Assigned to :

    • Select an auto attendant:

    • chamenaGharHelpdesk

  • Click on the save button.

Go back to click on Auto Attendants: you will see the Resource accounts = 1.

You can see the phone number is assigned.

Now Time to call in this number and test: +1 531 600 1365 You will listen to the auto attendant voice. If you press 1,2,or 3, the call will be transfer too.


Comments

Popular posts from this blog

Intune Windows Autopilot Steps-by-Step.

How to Map Network Drive using Group Policy Preferences?